Category Archives: Quilled pictures

A retrospective

Staging my Fellow’s Retrospective display at the Quilling Guild‘s Celebration of Quilling in Hartley Wintney last weekend made me realise what a lot of quilling I have done in the last 10 years, and just how far I have progressed! It also reminded me that I haven’t posted anything about the various competition pieces I have quilled this year, so I am remedying the situation now.

Firstly, here are some photos of my display at the Quilling Guild event, in which I included pieces that I have managed to win awards for over the years, along with examples of the way my work is progressing to encompass mixed media/collage work as well as conventional paper filigree.


This was the first big display I have staged since taking part in the Taunton Live Arts Festival and Taunton Flower Show in the summer, and now that all the competition events for me in 2017 are over, I am finally free to share some of the other new pieces I have been working on during the year to date.

My activities at Taunton Live have been well documented on my Facebook page here, so I am not going to repeat them all over again. Suffice to say that I had a fantastic time at the festival, made lots of wonderful new friends, and have bookings for several quilling workshops in the town as a result.

At the Flower Show, I entered one of the crafts competition categories with this quilled typographical piece which was Highly Commended by the judges. The word “Vivary” is the name of the wonderful Victorian park in which the show is staged, and I tried to reflect its peaceful ambience of fresh green complemented by vibrant floral colours in my quilling. By submitting quilled typography, I suspect that I may have fallen foul of the strict category guidelines which stated that one’s entry should be a “picture” … but no matter, I was very pleased with my commendation and several people I met were full of praise for my piece, even stopping to congratulate me when they saw me taking the picture down at the end of the show!

I also won a Second Prize with this card, which I entered into the category which required an entirely hand-crafted creation (no commercial kit components!) to welcome the arrival of twin baby girls.  I set the quilling within a recessed box frame, covering the roof section with vortex coil tiles and adding a nest for the babies on the chimney which I fashioned from real hair (my own)!

Another piece that I’ve been keeping under wraps is this quilled pendant that I made for the Quilling Guild’s Annual Challenge competition, which I created using a side-looping technique that I developed when trying to quill birds’ feathers.

I also managed to win First Place (Masters) in the ‘Anything Goes’ category of this year’s Quilling Guild competitions with this little creation of a snail which sits inside a coiled ring of LED lights, alongside lots of elements made from kitchen foil to create reflections:

Here I am receiving my award from Jane Jenkins:

So now I think we’re up to date again with this record of my quilling activities in 2017.

There is still much for me to look forward to with the possibility of forming a local quilling group following the success of the Guild’s recent Celebration of Quilling event in Hampshire, and the prospect of an Artist’s Residency at the Creative Innovation Centre in Taunton next year.

Watch this space!!


Counting down to Taunton Live 2017!

Just a few weeks to go now before the start of this year’s amazing Taunton Live Arts Festival on 24th July and things are hotting up in more ways than one!  I have created a page on this blog on which you can look at the full festival programme here.

Amid blazing sunshine and soaring temperatures, I am currently putting the finishing touches to all the pieces I am going to be taking to this year’s festival as time ticks rapidly by. It’s hard to imagine that this year’s event could possibly be even more exciting for me than it was in 2016 (see this post which is full of happy memories) – but the signs are looking good indeed!

This year I am going to be exhibiting framed quilled artwork in two different places.  Firstly, I will be participating in the Go Create members’ exhibition at the Winchester Arms which is situated right at the heart of the outdoor festival events on Taunton’s Castle Green. I have decided to take one new piece and two remaining from my church exhibition of 2016 which I hope may yet find buyers in this centrally-situated venue. Here’s the new piece, which is entitled ‘Love the Levels’:

It’s my interpretation of the peat-rich flatlands of the glorious Somerset Levels, featuring quilling strip ‘strata’ and gold/silver edged coils depicting light glinting on the muddy puddles of the moorland which stretches for miles around the iconic mound of Glastonbury Tor. I also added a quilled willow tree and reeds to complete the image which for me captures just a little of the magical essence of Somerset. I hope that visitors will like it.

This year I have once again been fortunate to have been given further exhibition space in Taunton through the Festival’s fabulous ‘Adopt An Artist‘ scheme. My ‘adopter’ this year is Priory Close Veterinary Practice in Canon Street who have generously offered me wall space in their spacious waiting room, plus some shelves which are visible from the street through very attractive arched leaded light windows.  I am going to take a few of my quilled ‘sculptures’ like these for the window space:

… plus the focus of my display of framed pictures on the waiting room wall will be birds. These will include my recently-framed ‘Resplendent Quetzal’ bird of paradise (pictured below), along with my quilled turtle dove, green woodpecker, and ‘murmuration’ of starlings (also below) which I created using Diane Boden’s amazing ‘fairy dust sprinkles’ technique that I learned at the Quilling Guild‘s last International Festival of Quilling in Liverpool in 2013.

Still on the subject of birds, I blogged earlier about the yellow bird I’ve created for the ‘origami wall‘ which is being planned for the Festival, organised by my good friend Fran who currently has people across Taunton folding origami birds by the dozen! I’m a bit concerned that my quilled bird may look a little out of place amongst all the folded ones, whilst Fran is worried that I’ve spent a lot of time working on something that may – sadly – end up being stolen or vandalised (it’s an outdoor installation). However, I’ve said I’ll be happy just as long as my bird flies on the wall long enough for me to get a photo of it. We’ll just have to see how it goes …

On Wednesday 26th July, I’ll be doing a ‘pop-up’ quilling demonstration in Taunton’s main shopping area, the Orchard Centre, alongside other ‘pop-up’ performances by various Go Create Taunton members. I plan to be making some quilled jewellery for the public to watch, and there will be an opportunity for them to have a go at quilling if they want to – I’ll have plenty of starter kits on standby! This event will also provide me with the chance to offer some of my quilled merchandise for sale – I’ve been making quite a few new cards and jewellery items this year.

On the jewellery front, I’ve been developing some new-style quilled pendants which my friends in Taunton are already quite excited about:

Over the months, I’ve progressed from multi-coloured creations based on solid coils to some interlocking hoop designs, inspired by some of the wonderful ideas shared by the eminent Australian paper jewellery-maker Licia Politis in the Quilling Guild’s ‘Quillers Today‘ magazine a few years ago. (Quilling Guild members can access this feature via the Quilling Now! blog).

As for cards … well, I underwent a bit of an ‘epiphany’ this Spring after attending a ‘Collage Creativity’ course at the wonderful Dillington House adult education centre.  Before going on this course, I had already started working on a few ‘mixed media’ designs featuring quilling, typography panels and embossing like this one:

However, after being told in no uncertain terms by the collage tutor to “put that craft knife down!!”, my designs have morphed into a much softer style with torn edges and distress inking along these lines:

I hope that the cards I have made will prove popular in Taunton.

These merchandise items will also be on sale at what I regard as my ‘main event’ at the Festival: I am honoured to be hosting a display of the Quilling Guild’s amazing GUINNESS WORLD RECORDS™ title display of 6,241 quilled flowers at the Temple Church in Upper High Street, on 28th and 29th July from 12 noon – 4.00pm each day.

I’ll be demonstrating quilled flowers at this free event, and I’m hoping that lots of people will come to see the display which is being billed as one of the highlights of the Festival.

So, with all this going on, I’m sure you can imagine my rising sense of excitement as I count the days until the beginning of Taunton Live on 24th July. If you live in, or find yourself in the area during the Festival week, do please come and see me at one of my events, and take in the rest of the Festival which will be packed with spectacular art and performances of every kind. It is my absolute pleasure and privilege to be part of it.

Portcullis

Portcullis

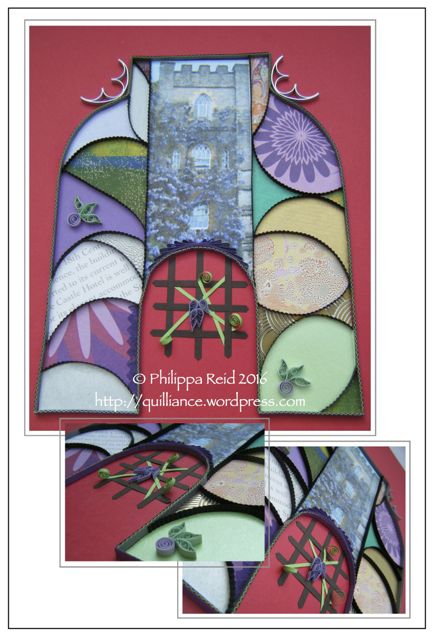
My favourite hotel in Taunton is The Castle Hotel – an historic building whose elegant facade is graced by a magnificent wisteria that bursts into flower in late April each year. At one end of the building is a tower, beneath which is an archway spanning a cobbled street. Set into the archway is a wonderful portcullis – a suspended wooden lattice which, in medieval castles, would have been raised or lowered for the purpose of access control.

I wanted to make this the subject for my latest quilled collage, which is destined to be displayed in the town during this summer’s Taunton Live arts festival.

The central image shows the hotel tower, looking its very best with the wisteria in full bloom. I constructed the shape for the collage using two different types of arch: the outer one is called a ‘shouldered arch’ whose square top allowed me to accommodate the whole of the tower and its castellations. The inner one is a simple curve echoing the shape of the real arch on which the tower is supported, giving me the opportunity to try and represent the portcullis using quilling strips.

I cannot look at the portcullis without being reminded of a garden trellis, which is why I have used it as a supporting structure for some climbing quilled wisteria. A fitting tribute, I hope, to the beauty of this lovely hotel in springtime.

Portcullis will be placed on public display at various locations in the coming months. Should you be interested in purchasing something similar (custom-made), please contact me by emailing quilliancemail@gmail.com or leave a comment below.

Tudor Timbers


Tudor Timbers #2

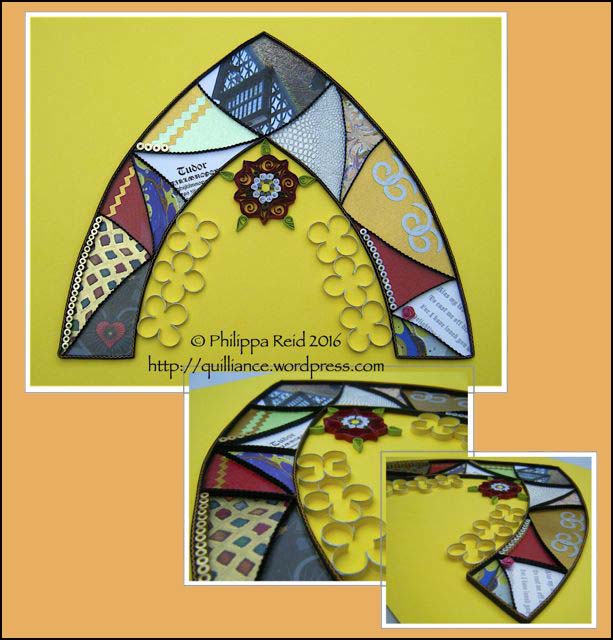
The title of this collage – Tudor Timbers – refers to the picture at the top of the arch which shows one of Taunton’s most iconic landmarks, dating from the 16th century.  This lovely half-timbered building stands right in the centre of the town, and always used to be known as the Tudor Tavern. Today it is a coffee shop, but I remember it back in the 1970s as a Berni Inn (oh happy days!!), with a separate room at the back called the Hangman’s Bar. The hangman in question was the infamous Judge Jeffries who presided over the so-called ‘Bloody Assizes’ in Taunton in the late 17th century. This followed the suppression of the ill-fated Monmouth Rebellion at the Battle of Sedgemoor, in which many local citizens had unfortunately been involved. Despite this somewhat grisly association, the Tudor Tavern remains a potent symbol of Taunton’s history, and seemed to me to be the perfect centrepiece for a Tudor-style collage. I like the way the steep roof of the Tavern zig-zags down towards the right hand side of the arch, highlighted by a subtle patina of moss on the richly coloured roof tiles.

Like my other collages, this piece is divided into brightly coloured black-bordered sections reminiscent of a stained glass window, with quatrefoil tracery shapes positioned on the inside of the arch. The tracery is constructed from 3mm pastel yellow/silver-edged quilling strips, crowned by my quilled interpretation of a Tudor rose. Two of the window panels contain typography: look closely and you will see that the one positioned towards the lower right includes the opening words to the famous Tudor song, ‘Greensleeves’. I decided to decorate this particular panel romantically with a folded paper rosebud. The interlinked silver spirals in the gold panel above it were made with a punch – I had to insert the paper first forwards and then backwards into the punch to form each pair, because the paper I used was only coated in silver on one side. (I’ve had to learn how to think both upside down and back to front when making these collages!) The serrated decorations on the left hand side of the arch were made by cutting paper with pinking shears, and I’ve also included numerous tight pegs made from gold and silver edged quilling strips throughout the design. The borders for the arch were created using the quilling strip ‘sandwich’ technique described here.

DSCF7393I promised to share the pattern for my Tudor rose, so – for the quillers amongst you – here it is:

I worked with 3mm (1/8 inch) wide quilling strips, cut into lengths as detailed below. These lengths are necessarily short, since the main body of the finished rose measures only 30mm (just over 1 inch) across – yes, be warned, it’s fiddly to make! However, the pattern could easily be scaled up if required.

Make 10 closed loose coils out of 26 mm (1 inch) lengths of crimped white paper, and five tight pegs out of 26 mm (1 inch) lengths of grey paper. Create five pairs of white coils by gluing them together side by side. Then add one grey peg to the base of each pair as shown in the photo. Glue these three-coil sets together in a ring, working over circular graph paper.

Use a yellow strip to create a tight peg big enough to fit inside the ring, and glue it in place.

Make 5 teardrops from 3 mm (1.25 inch) lengths of dark green paper and glue these in position between each pair of white coils, pointing towards the centre of the rose.

Make 5 crescent/bunny ear shapes (refer to photo) from 225 mm (8 inch) lengths of dark red paper for the rose petals and glue these in position above the white coils, separated by the dark green teardrops. Glue the tips of each petal together.

Make 5 teardrops from 3 mm (1.25 inch) lengths of lime green paper and glue these in position as shown in the centre of each red petal.

Voila!

If you use this pattern and post a photo of your Tudor rose online, I’d be grateful if you could please include an acknowledgement to me and a link to this blog post – thank you.

Tudor Timbers will be placed on public display at various locations in the coming months, including the Taunton Live 2016 arts festival. Should you be interested in purchasing something similar (custom-made), please contact me by emailing quilliancemail@gmail.com or leave a comment below.

Viva Vivary!

Viva Vivary #2

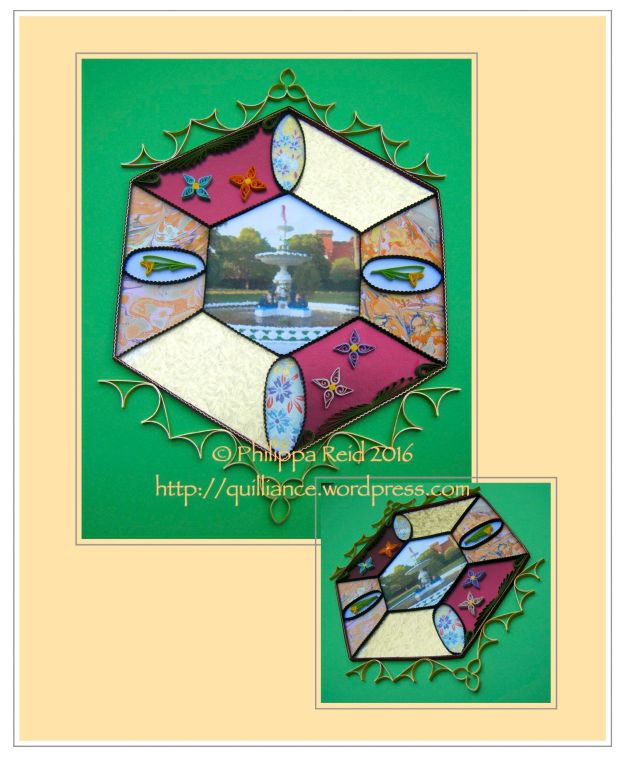
One of the many treasures to be found in Taunton (the county town of Somerset in south-west England) is a classic Victorian park which was first laid out for the public’s enjoyment in 1895.

Known as Vivary Park (after the medieval fish farm or ‘vivarium’ that was once sited there to serve Taunton’s ancient castle and priory), it features prominently in my memories of life in Taunton in the 1970s, and is still one of my favourite places to visit whenever I find myself in the town.

Vivary Park is the venue for the famous Taunton Flower Show which takes place annually in August, at which I was thrilled to win some prizes for my quilled art last year.  If you like, you can read about that particular adventure here and here.

The park has now become the subject of my latest quilled collage featuring gothic-style tracery, which aims to create a decorative ‘window’ on to this peaceful and colourful oasis in the town. At the centre is a digitally stylised picture of the gorgeous fountain which was unveiled as a memorial to the late Queen Victoria in 1907, and which is regularly re-painted in vivid bright colours which preserve its original magnificence even in modern times. The beauty of the fountain is echoed by fabulous displays of flowering plants throughout the year. There is also an elegant Victorian bandstand in the park, plus a peaceful sensory garden area – it really is such a delightful place!

I have tried to capture the rich colours of the park in this collage through my choice of background papers and the quilled flowers I made to complement them. Quillers will notice a little combed work along the edges of the deep magenta panels, nestling in between crimped-strip teardrops. The tracery is constructed using 3 mm gold-edged gold strips, triple-rolled to create ring coils around dowels. By cutting the ring coils, it is possible to make arcs that form the basis of classical gothic architectural shapes. I’m learning more and more about the geometry of tracery every time I make one of these pieces!

This picture will be placed on public display at various locations (including Taunton) in the coming months, unless previously sold. Should you be interested in purchasing it (or maybe even something similar, custom-made), please contact me by emailing quilliancemail@gmail.com or leave a comment below.

Viva Vivary!!
Gold beneath Burrow Mump

Gold beneath Burrow Mump


So, this is the style that I’m adopting for my gallery collection: a segmented collage of different background papers, individually bordered with black crimped paper strip ‘leading’ like the panes of a stained glass window – all contained within a rigid framework made from ‘sandwiched’ multiple quilling strips and selectively decorated with various forms of paper filigree. Continuing the stained glass window analogy, each piece is going to be framed by tracery shapes, constructed from metallic-edged quilling strips. In church architecture, tracery forms an integral part of the window, crossing the panes, whereas mine positions itself – perversely! – around the edges.

If art provides an insight into a person’s soul, this speaks volumes about my affinity with bold shapes, ideas and colours. I’m so excited that others have seen and responded positively to this unique new style of mine … and I feel as though my creativity has been unleashed in a way that I’ve really never experienced before.

Yes, it’s moving away from quilling just a bit … well, away from ‘traditional quilling’, anyway, and for that reason I suspect it may not necessarily find favour with all of my friends and acquaintances in the ‘quilling blogosphere’. However, quilling still underpins the work in so many different ways: in the tracery (ring coils, cut and joined); in the edging (straight and crimped quilling strips sandwiched together); in the decorative detail of the window panes (open coils, ring coils and delicate huskings – the very essence of filigree as practised by our ancestors).

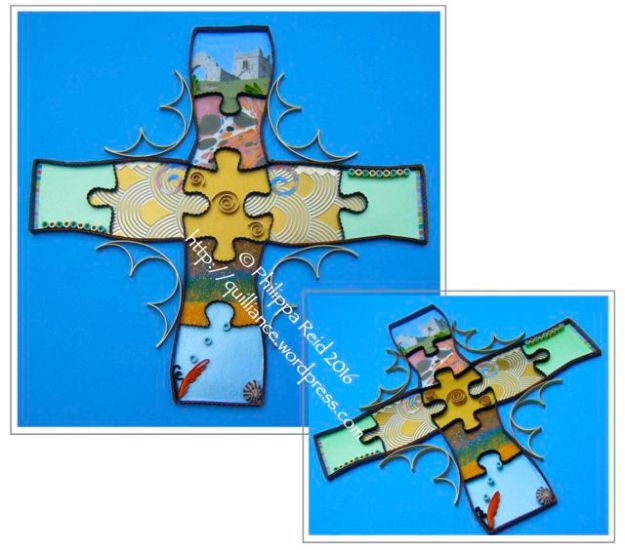
Because the piece shown above speaks for my soul, it had to contain just a little bit of Somerset. You’ll find this in the uppermost segment: a tiny image showing the summit of Burrow Mump – an iconic hill which rises dramatically out of the flat lands of the Somerset Levels.

King Alfred the Great is known to have climbed Burrow Mump to scan the distant landscape for marauding Danes in ancient times. During the time of his reign as the King of Wessex, the area of the Somerset Levels was a vast, marshy sea in which this natural knoll stood out as an island, making it an ideal lookout post. The ruin at the top of the Mump is the medieval church of St Michael which was used as a refuge by Royalist soldiers during the Civil War. Soon afterwards, the King’s army occupied it again during the Monmouth Rebellion of 1685. The views from the summit of Burrow Mump are spectacular to say the least. As you catch your breath beside the ruined church after your steep climb, you can look out towards other ‘islands’ standing in the Levels, such as Glastonbury Tor and Alfred’s own royal Isle of Athelney. The Rivers Parrett and Tone converge at the foot of the Mump and flow away together to the Bristol Channel. It’s a truly magical place.

When creating this piece, I imagined that there might be gold deep inside the Mump, stretching out beneath the strata of the rock. Go deep enough down, and you might eventually discover subterranean water, whose colour echoes the brilliant blue of the sky above. However, I will leave my image of the Mump to speak to you in its own way …

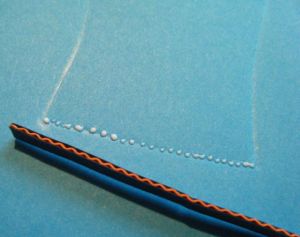
For those who are interested in the technicalities of these things, I created the outline for this collage using a cross formation assembled using blank jigsaw pieces, which then provided templates for the individual segments of the design. The borders of the cross are delineated using my quilling strip ‘sandwich’ technique , glued down on to an outline shape which I embossed on to the blue background card over mounting board, using the crooked end of a crochet hook. In this photo, you can see how I applied tiny dots of glue into the indented outline and allowed them to go ‘tacky’ for a minute or so before placing the ‘sandwiched’ strip into position on the background card:

DSCF7358


I am proud of this piece, which will be placed on public display at various locations in the coming months, unless previously sold. Should you be interested in purchasing it (or maybe even something similar, custom-made), please contact me by emailing quilliancemail@gmail.com or leave a comment below.


The opportunity I’ve been hoping for!

All too often over the past few years, I’ve been unable to share photos of ‘work in progress’ here on my blog because the projects have had to be kept ‘under wraps’ … usually because they were destined to be competition entries. I very much enjoy entering competitions staged by The Quilling Guild (and other organisations I’m connected with such as Taunton Flower Show), but I love my blogging too – and now, finally, I’ve got a new objective in view that I’m able to ‘go public’ with right from the start!

I have been invited by Freda James, the owner of Gallery Fifty Five (in Hartley Wintney, southern England) to submit a collection of framed quilled/collage artworks for display in her Spring 2017 Exhibition, where I will be introduced as a Featured Artist.

This means I now have twelve whole months in which to work on creating the pieces that I plan to exhibit (and hopefully sell!), bringing me exactly where I want to be in terms of featuring my activities publicly on this blog and perhaps even enhancing my reputation as an aspiring artist.

This very exciting opportunity arose for me after I had shown Freda a quilled/collage picture that I’ve just completed. Now, true to established form, I cannot show you this particular one in its entirety just yet because I’m intending to enter it into a couple of competitions in 2016 … but I am going to share a tiny section of it here so that you can see the kind of style that I’m going to be developing for my Gallery collection:

Window section


It features cut-out sections of various background papers on a black background, embellished with quilled shapes and bordered with ‘sandwiched’ lengths of bundled quilling strips … all linked together with a network of the quilled tracery that I’ve been developing in recent months, and which has already been featured in several of my earlier posts this year. Once the competitions are over, this particular collage is going to be the centrepiece of my 2017 exhibit.

I’m really excited by the potential for these tracery shapes in quilling, echoing the wonderful curved and intersecting patterns that are found in gothic-style stained glass window architecture. Now I have the opportunity to develop them fully and explore their potential in some ‘proper’ art pieces.

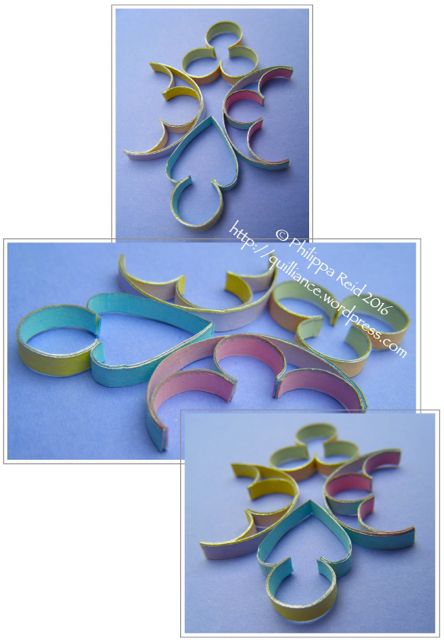
I started with some experimentation this past weekend, after obtaining a quantity of silver-edged mixed pastel coloured 3mm strips which have allowed me to try making some ‘multi-coloured’ tracery pieces:

Coloured tracery


The initial results are quite pleasing, I think. I obtained these pastel-coloured strips privately, but will be happy to share details of the supplier on request.

I also plan to do lots more work with the wonderful solid gold/gold edged and solid silver/silver edged strips from JJ Quilling Design that I now have in my stash and which have brought me the closest I’ve ever been to feeling that I’m actually working with precious metals.

Right now, I’m starting to put together my next piece in which quilled tracery will be featured centre-stage … and I’ll definitely be sharing it here as the work progresses. Maybe there are some potential buyers out there who are going to like what they see – well, you never know!!


A trio of sea horses!

Seahorses copyrighted

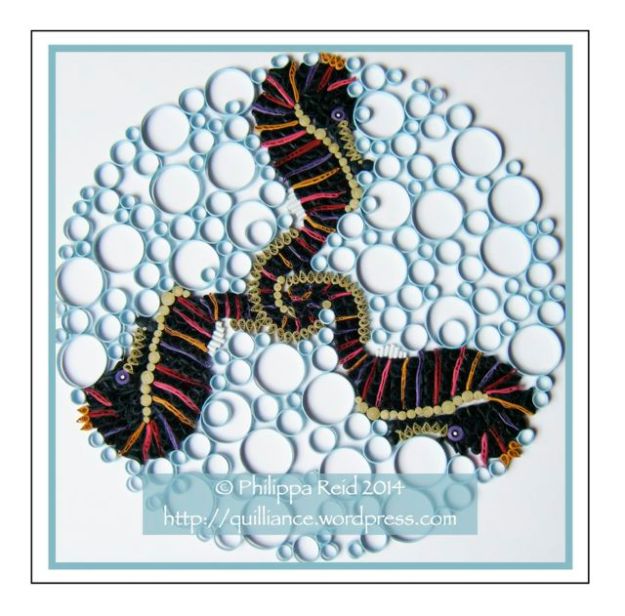
As a quiller, I am always on the look-out for spiral designs in all their forms, and am interested in the way that spirals can interlock together. On a visit to Petworth House (a stately home in Southern England) a while ago, I saw a lovely pair of Chinese vases with handles moulded in the form of colourful sea horses, and my eye was immediately drawn to the spiral formation of their tails. This encouraged me to try quilling some sea horses in fanciful colours. Having also seen various circular plate designs featuring a trio of fish with their bodies forming the radii of a circle, I decided to try and create something similar featuring sea horses. This idea enabled me to explore the way in which their tails would coil together.

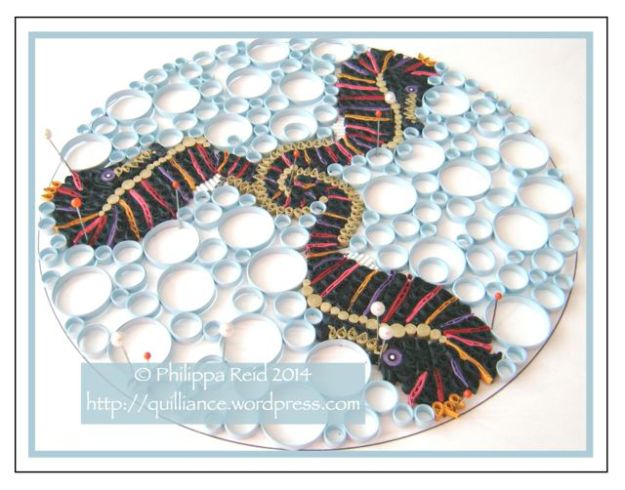
I began by sourcing a line drawing of a single sea horse from a children’s colouring book. I scanned this in to the Photoshop software on my computer, replicated it twice, and manipulated the resulting three identical sea horse images to form the basis of my design within a circular frame. The resulting image was printed out and placed (under clingfilm) on a mounting board into which pins could be inserted.

I spent a long time deciding on the repeating sequence of colours for the sea horses’ bodies for maximum visual impact. My idea was that the three sea horses would be set within a lattice of open ring coils, representative of bubbles under the sea. I began by quilling the sea horse whose tail appears on the top of the other two, in order to clarify the complex pattern of the interlocking section. My original idea was to create the rings for the lattice in several different shades of blue, but the process of laying the rings down loosely in position at this stage convinced me that this approach would detract from the colours of the sea horses. I therefore discarded it in favour of a lattice formed from rings made in a single shade of light blue.

The dark green sections of the sea horses’ bodies were made using a combination of closed loose coils (some circular and some shaped into diamonds) and unglued wheatears (some formed into diamonds and some left straight), for maximum visual interest. All these shapes can readily be moulded to fit into irregular spaces. The coloured stripes are all glued wheatears. The spines and crests are all teardrops. Solid pegs have been used for the chest sections, nose and eyes. 3mm strips were used throughout – chosen for their paper quality and bright, consistent colours – with wider strips for the back fins, rolled into tubes.

Here you can see the design nearing completion on the board:

seahorses 2

With some trepidation, I managed to lift it away from the clingfilm as a single piece, and have mounted it on a plain white background … some more fantasy sea creatures to accompany my octopus!

An undersea fantasy

Octopus copyrighted

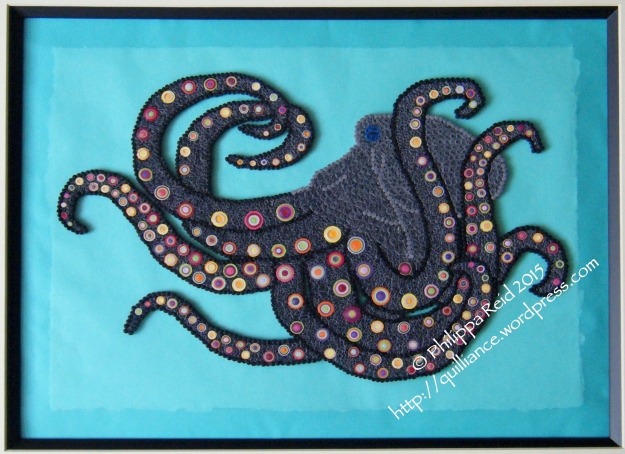
Now that the Quilling Guild‘s competitions for 2015 are over, I can finally share with you my ‘fantasy octopus’ which is pictured here.

This piece comprises literally thousands of quilled pieces, which took me well over six months to complete and assemble! The shape of the octopus is bordered with tiny solid coils (all fastidiously made without holes in the middle!), while the grey infill pieces are a combination of tiny ‘S’ shaped open coils and mini vortexes.

The suckers are all solid coils made using sequential permutations of two carefully chosen sets of colours. They vary in size to reflect the pulsating movement of an octopus when it swims. On some tentacles two rows of suckers are showing, while on others there is only one row; this reflects the way the octopus constantly rotates its ‘limbs’ as it moves through the water.

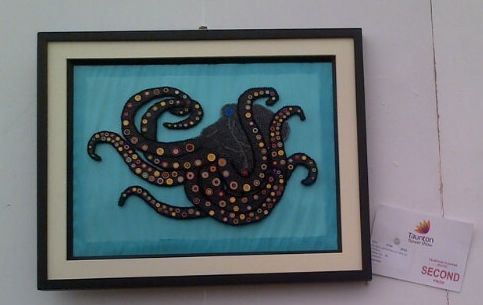
I mounted the octopus on a multi-layered ‘mat’ of specialist papers to create a semi-transparent watery effect. This was accidentally enhanced when the piece was on public display in a marquee earlier this year, where high humidity and condensation produced unintentional ‘ripples’ in the background water in an unexpected act of serendipity!!

The photo you see above was taken BEFORE the marquee experience, which occurred when I entered the octopus into a competition at the highly prestigious Taunton Flower Show in August. I’m delighted to say that the piece received an award at the show, which was especially gratifying considering that it was judged up against pieces made using many other ‘mainstream’ craft techniques such as embroidery and cross-stitch. Below you can see a photo of it at the show, in its ‘rippled’ state – which I now consider to have been a very ‘happy accident’!

IMG_0239

Bordering on Antiquity

Bordering on Antiquity

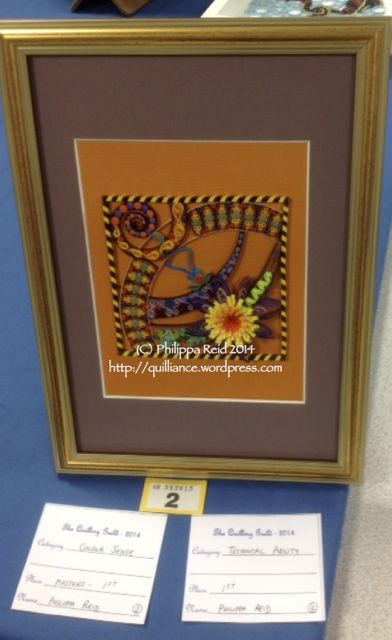
I have just returned from The Quilling Guild’s fabulous AGM and Display weekend in Dereham, Norfolk, and am still buzzing with excitement over the fact that I received THREE awards for one of my competition entries!!

This framed piece, which I call ‘Bordering on Antiquity’ is one of the ‘secret’ pieces which I had been working on during all my months of blogging silence last winter/spring – finally, I have the opportunity to share it with you here!

The awards I received were:
First Place in the Masters category for Colour Sense
First Place for Technical Ability
First Place for Intricacy
… and I simply could not feel more proud.

Here are some notes that I wrote earlier about what inspired me to make the piece and how I went about creating it:

This piece was designed to explore some of the border decoration techniques seen in antique quilling and bring them together in a modern design.

Chichester Cathedral windowMy inspiration came from an interest in the concept of overlapping/interlocking circles and, in particular, a modern stained glass window seen in Chichester Cathedral (shown here) whose design I very much admire.

I wanted the background for my design to be a rich gold colour, and this influenced my choice of bright, complementary colours for the quilling which I wanted to ‘jump off the page’ as if lit from behind (rather like the stained glass window). The borders for the circle sections were hand-cut from light card which I knew would hold its shape after being curved to the necessary radius. The card I chose for the brown circle borders is semi-metallic with a slightly bronzed effect to complement the sparkling metallic edges of some of the quilled sections. With the exception of the fringed flower petals, all the strips used in this project were 3mm in width.

Corner viewI began by creating some overlapping circle and spiral shapes on my computer, set within a square border. I printed this out and placed it under clingfilm on a mounting board into which pins could be inserted. To delineate the square border, I ‘bandaged’ and cut to size four batches of strips which were glued together at the corners and held in place with pins. I then cut and curved the cardboard strips for the circular and spiral sections, gluing them into position and securing with pins. These marked out the various sections which I wanted to fill using techniques seen in antique quilling.

Techniques used:

Spiral: tight pegs and an alternating pattern of closed loose coils and curved teardrops, seen in the 19th century instructions for Mosaicon.

Border of oval ‘medallions’ made using shaped tight pegs edged with gold, closed loose coils and an outer ‘sandwich’ edge comprising plain and crimped (metallic) strips. The medallions are separated by ring coils. Use of such medallions is described in Brenda Rhodes’ ‘History of the Art of Quilling’ as an 18th century technique.

Shaped ring coil joined to tight pegs and two leaf shapes, leading the eye to the central point of the design. The shaped ring coil is another example from the Mosaicon instructions.

Border of ‘S’ coils and huskings following a suggested border design which also comes from the Mosaicon instructions.

Border comprising open coil ‘cherries’, vortex coils and teardrops, spaced using closed loose coils – my own invention – inside a ‘sandwich’ of plain and crimped metallic strips.

Pom-pom style fringed flower made by overlapping sloping strips of orange and yellow paper, with three-colour wheatear petals and a green ‘tendril’, mounted on a tight peg to raise it above the level of the circular borders.

The main challenge encountered when making this piece was scaling the border components to fit reducing-width curves, achieved by careful experimentation!

I was pleased with the way this piece turned out, but never dreamed that it would achieve such success in The Quilling Guild’s competitions. It just goes to prove, once again, that you should always expect the unexpected!

Placement cards